Sunday, April 28, 2013

Marking Spirals On Welsh Quilts

Spirals patterns are one of my favorite patterns on Welsh quilts.  Spirals may seem to be a very simple, ordinary pattern but like other patterns on Welsh quilts, the magic happens when the spirals get combined with other  patterns into the overall design. 

When I started working with Welsh quilt patterns, it took a while for me to relax and just draw spirals without trying to make them all perfectly round or matched to each other.  In the early 90's, quilting stencils were still in wide use here in the States and American quilting was overly dependent on them.  I had used the stencils but didn't like them because of the limitations of the stencils and this was a big part of my attraction to Welsh patterns... they seemed so free.

Over the years, I've generally marked patterns two ways.  The first was to make my own custom-fit stencil and the second was to just free-hand mark patterns.  In my early years, I mostly used the stencils, partly because it speeded up the marking but still looked like a hand drawn pattern.  When I was teaching workshops, it was much easier for students to adapt to stencils because they also had stencils in their quiltmaking background. 

The basic steps for making a stencil was to draw the design onto template plastic with a black Sharpie pen and then cut along the lines to leave a gap big enough for the fabric marker to get in and mark the pattern.  I used narrow strips of masking tape (on front and back) to bridge the gaps and stiffen the stencil.  Sometimes, I did a whole pattern but often I marked the whole pattern but only cut and taped half of it.  It isn't the way the original Welsh quilt patterns were marked but it works.
These are stencils from an earlier quilt, laid out on the current quilt to show the marked lines and how the gaps are bridged with narrow strips of masking tape to hold it all together.  The stencil would be flipped to mark the other half.

My favorite way to mark patterns is by hand.  I do the dividing of the main parts of the design with rulers but I've come to really enjoy the hand marked patterns which are more consistent with the old quilts. 

In the picture below, part of the patterns were marked with help from stencils and some free-hand.  The spirals were marked free-hand with a little help with the spacing.
The picture below shows how a circle can be divided up for spirals or any other pattern.  I took a sheet of printer paper and cut a basic curve for a quarter circle and then folded the circle into 3 sections from the corner out (the folds barely show in the picture).  The folds are nipped at the ends to help with seeing them and the remaining square corner of the paper is positioned into the center of the circle and the circle border can be divided up for the spirals.


Now the curved border has been marked using the paper shown above and a ruler was used to finish the marking the spaces.

This picture shows how the spiral was marked with soap but the quilting doesn't have to exactly on the marked line.
 
 
I like patterns that fill the space so when I go to mark a spiral, I often put soap marks where I want the lines to go as is shown in the center of the picture... then I just connect the marks for the spiral.

Another tip for spirals is to know which way you prefer to hand quilt spirals because some quilters have a definite preference.  You can try marking samples of spirals going both directions and see if one direction is better than the other.  If you like clockwise spirals better than counter-clockwise (like the ones above) then it'll save you time to mark them for easier quilting,  The best way is to be able to quilt in any direction with different fingers.

May you have many happy hours quilting spirals.

Sunday, April 21, 2013

The Story For Today

I usually re-read my posts and find myself going back and fixing things that don't make sense or are just spelled wrong. I caught a spot on the last post that didn't make sense so hopefully it does now.  As I've read over the first part of what is intended to be my Welsh marking tutorial, I find myself wanting to include so much more information, especially step-by-step sketches like I used to do on a big dry erase board in class.  I think I've got that sorted out now so I can expand a bit more on some of the techniques.

It's been a really busy week which is the way I like it but it's also been such a big news week with the Boston Marathon Bombing and the manhunt. I feel really bad for all the affected victims.  Yesterday was the board meeting for ApParent Project in Haiti and I'm really excited about their jewelry being featured on one of the major morning news shows this week.  They are also preparing to be used in some hunger relief in an area of Haiti that lost crops to severe weather this past year and are hoping that the weather doesn't take out the crops that are coming to maturity at this time.  They intend to buy the food for relief in Haiti rather than buying from outside because it will also help Haitian farmers who struggle to compete with the huge imports of cheaper food from the States.  You can check them out at ApParentProject.org

Today is my art quilt group meeting and I'm really looking forward to it, it's a great group of women and one man... it isn't what most would think of as an art quilt group because it isn't strictly new, innovative techniques.  Over the four years we've met, it has become much more about the encouragement of each person's creativity and oftentimes the pieces that show up are very rooted in the traditional but I think it should be that way.  I've taken Welsh quilts to show because they are the ultimate art quilt to me.
This is Betsy, showing the two pieces on the right.  The piece on the left was a joint project of the whole group a couple years ago.  I drew up the line drawing, cut it into 6' squares and then each person did a small collage in black and white printed papers and then it was repeated in fabric which is what is on the display panel.  It was really beneficial to different people in different ways partly because it was just a small collage of fabric that wasn't big enough to intimidate after doing it the first time on paper.  We'll be doing an exhibit at a library later this year and our group piece will be there.

Tomorrow will be a big day for me too.  I'm going up to train on the cash register at Gee Gee's (my local quilt shop) to be their fill-in part-timer. They won't have to instruct me about their fabric cutting system, I've already got it memoriazed.  I decided to get a part-time job in the shop since my teaching as an independant in the shops has come to an end.  I'm like a border collie, I have to stay busy or I'll get into trouble.

And, last but not least, I have the sample from my last class to finish machine quilting before class on Wednesday.  This shot is of it a couple weeks ago.  I'll show it when it's done this week.  I have pictures in my camera of it but time has run out this morning.  Gotta get in the shower and run into town to meet with the group.
 
May we have peace on Earth.

Friday, April 19, 2013

Marking the Fabric... Just a Series of Decisions

I've chosen my red sateen for the front of my Welsh-inspired quilt and I have a big bold print for the back.  I've chosen a cotton batting with just a bit of polyester for stability.  I've pre-rinsed and dryed my fabrics and the batting got sprayed with water and tossed into the dryer to take the folds out of it and do a bit of gentle pre-shrinking.  If you don't follow the same routine, that's fine by me but I've done it like this for so long that it's just habit.

My red fabric for the quilt top is laid out on my work surface and due to the small size of the sample, it works fine.  If you want to mark a larger top it's much easier to use a larger table... sometimes you can borrow the tables in your local quilt shop to get started with the marking.  The marking process is just a series of choices and the first one is to decide how big the quilt will be.  My sample quilt will be marked 20" by 32" but when the quilting is finished it'll be smaller due to the quilting.  I'll be marking with a soap sliver (don't use a moisurizing soap with oil) which is very temporary so once I've marked the basic lines, I put the front fabric, batting and backing fabrics together and baste right on the lines that are important.  I usually change to another thread color to do the rest of the basting so that I don't get confused over which basting lines are to be quilted.  The soap or chalk works well on dark fabrics but won't on light fabrics.  I've used the rinse-out blue markers for years on light colors and I think the key to using them is to soak the quilt when rinsing rather that just dabbing the marks with water.  More on this later when I take my sample through the finishing up.

To mark the quilt top, think of it this way... decide how big it will be and then divide the area up into borders and center circles... outline as needed and then divide and outline again and fill the created spaces with patterns.  Sounds easy?  Don't worry about doing it all perfect, if you don't risk imperfection, you'll never get any pleasure.  I don't work at perfection, I like the quirky quilts best.  I'll share one of my marking mistakes later....


First of all, I mark vertical and horizontal lines in the center of the quilt.  Usually, I mark temporary lines with a broken line and quilting lines with a solid line but here I marked both center lines with a solid line.  The rulers show how I got the lines square to each other.


Now I'm ready to mark the outside lines of the quilt.  I'll measure out from these center lines to mark the outside lines which will be the outermost line around the quilt design.  There will be 3" borders on all four sides and these will all be outlined from the border side of the line which will show up in a picture when the quilting is being done.  It isn't a big deal which side of the lines the double lines are marked on but they should all be the same.  There will be a 4" border on two of the sides which shows up in the picture below to the left of the marked circles.  The circles in the center are about 12" and 7.5".  I tend to like larger circle designs for the center rather than smaller ones.

This picture shows the all of the lines that do the basic dividing up of the space marked and the layers basted together on the lines.  This isn't the traditional way but a way that I've developed because I'll quilt this in a hoop.  So, the space has been divided into the basic spaces and is ready to mark the double lines which will give definition to the different spaces and keep things from blurring together.

Notice the different color of the fabric?  Same quilt top but it's been turned 90 degrees in this picture and the cotton sateen shows up as a very different color.  Gotta love sateen, it's full of surprises.  So, here's the same top with the dividing lines and double lines quilted.  Notice how the outer quilted lines aren't double at this time.  These will stay this way for the time being.  I've always struggled a bit over what to call the lines that echo the dividing lines... I've referred to them as 'outlining' and 'double lines' but they are just one line echoing another.  It doesn't matter what they're called as long as they get included.  Now the quilt is ready for the patterns to be quilted into the divided spaces but I thought I'd add a bit about how I make templates.

These are some of the tools I use for marking.  The picture below shows how the circle template was made for the center circles.  The funny ruler in the back is a yardstick ruler point fitted to a yardstick and a small hose clamp to hold a Sharpie marker which is what I use on template plastic.   I use this homegrown yardstick compass for big circles.


This is how I make templates for marking.  I mark a quarter or so of the circle.  The inside circle is marked and the line cut away wide enough to allow marking. I place narrow strips of masking tapes across the cut slits (on both sides of the template to make it more stable).  I also have a very small black dot marked where the very center of the circle would be.  I prefer to make the template a little larger and mark the center where I can see it better to center it with the lines on the fabric.

So, in the next post, I'll show how the circle is divided up to be filled with spirals,  also known as Welsh 'snails'... stay tuned.

Wednesday, April 10, 2013

A Little Trick For Burying Hand Quilting Knots

Cotton sateen is my favorite fabric for handquilting and a solution to one of it's quirks has developed so I thought I'd see if it works for other quilters also.
This picture shows the texture of cotton sateen.
Quilting on sateen creates lusious texture on finished quilts and some quilters describe quilting through it as like "quilting through butter".  Now, I can assure you that it's very nice to quilt on but like butter?  I've never been able to quite figure out that word picture... but after years of quilting, one quirk that has always stood out as a nuisance is burying the knots properly.

When it's time to end a line of stitching, I make a small knot right against the surface of the quilt and then I pull on the thread gently to pull the knot out of the way and I attempt to stick the needle in the same opening created by the knotted thread as it comes up out of the fabic.  If all goes well, the needle slides between the layers of the quilt and is pulled back up through the quilt top fabric and with a gentle tug, the knot slips through the tiny opening made by the needle and thread and disapears inside the quilt layers.  The needle gets pushed  back up through the fabric nearby and the thread gets clipped... any remaining tail is pulled back between the layers or helped along by the point of the needle.

But, sometimes the knot burying doesn't go so well... the needle didn't quite get in the right little opening and the knot hangs up on an unseen thread and won't pop under the fabric.  The knot has to be carefully poked and prodded with the needle to pull it back up to try again.  Now it's possible I'm the only person this happens to or maybe it's the way I bury my knots... whatever, but it's really frustrating. 

The other night I was quilting on the red sample piece that I'm using for the tutorials and I spent about 20 minutes trying to get a knot back up so I could start over (this was a new world's record for me).  I was'nt able to get the knot up and out of the little hole but it wouldn't bury either... it was hung up on those little sateen fibers and the more I dug away at it, the more little threads of sateen I was causing damage to.  So, my little razor-sharp brain went to work and figured out a solution which is really simple. 

Now when I go to insert the needle to bury a knot, I do everything the same but just before pulling on the needle to pop the knot into the quilt, I take a piece of waste thread a couple inches long and I stick it through the loop of the thread that is being pulled down through the layers.  Now, as I pull on the thread, I can see the knot disappear into batting and I can pull the waste thread out and keep going.  But, if the thread won't pop down into the quilt, I can use the waste thread to gently pull the knot back up and do it again... no damage to the sateen.  It works, I've been using the technique for a couple days and while it takes a little longer, it has actually saved me time.  But more important than that, it's really reduced my frustration level.  I'm enjoying the quilting more and I don't have to have magnifying glasses and a bright light to see to bury those pesky knots. 

A great help to those of us with 'mature' eyes.
A sateen quilt at Beamish Museum, it appears to be different colors but it's all because of the way sateen reflects light when it's cut and turned 90 degrees.  The difference here is the result of the camera flash and the angle of the camera to the quilt.  For best results taking pictures of sateen quilts, shoot them almost straight on and if possible, without a flash.  Taken during a visit to N. England in 1997.

Happy quilting.


Saturday, April 6, 2013

Welsh Quilt Marking Tips... Tutorial

One of the challenges for me when it comes to teaching this process is that it's very easy for me to assume that others understand some of the foundational basics that I take for granted so I thought I'd cover a bit more before going to fabric.

Marking a quilt for quilting can be really intimidating.  When it comes to marking a Welsh type quilt top, it doesn't have to be a scary thing because it's basically just a series of choices which are made one after the other.  The quilt can be planned on graph paper first or with some experience you can go straight to the fabric.  I still make a basic plan on paper but I rarely stick to it. Allowing innovation along the way makes for more interesting quilts and I suspect that the Welsh quilters understood this well.  (The Celtic ancestors of the Welsh had a highly developed understanding of design and creativity).

So, a few more tips on sketching your design on paper.  When I was working with quilt guilds, I usually did a 2-day class.  The first day we worked on paper and the second day we marked fabric.  The first thing we did was mark around a 6"x24" ruler on a very large piece of paper and then proceeded to divide the 6"x24" 'border' into triangles or whatever so we could fill the divisions with Welsh patterns.  This was the point where many of the students froze up, afraid to make a mistake but after making a few marks on the paper, they were off and running and by the end of the second day they were fearless.  Try marking around your 24"x6" ruler as a 'border' and then fill it with patterns, you have nothing to lose but much to gain by just doing it.

Here's an important tip... when marking, rulers are good for straight lines, creating and dividing the whole quilt surface into borders and so on but when it comes to measuring a border to be divided into triangles or any other shape, the best measuring tool is simple paper tape like you'd put in an adding machine (for those of you old enough to have ever used such a thing).  You just roll the tape out to the length of the border and cut it off neatly... don't tear it.  Now you can fold the tape and use it to figure the spacing within the borders..  I'll get into this more a bit later and also, if you have access to a copy of my Handbook, page 36 has some information on using paper tape to figure spacing.  This really simplifies the marking... there's no fractions to remember as you mark and if you still need to fudge a bit on marking, it's no big deal, just slide the paper strip a bit whichever way you need to..  For now, go find a couple rolls of paper tape, any will work but don't get the thermal kind, just the plain stuff.  Paper is far more useful with this style of marking than rulers and it's a lot more fun.

Here's another tip to remember when marking on graph paper... just because you can draw a pattern into a space on graph paper doesn't mean it'll fit the space in real life.  For example, you've drawn a corner square and on graph paper it's 4 squares by 4 squares and you've planned each square to equal 1".  Now you draw a pattern in the corner block within the 4x4 little squares and tell yourself how great it'll look but will it?  To check out your plan, draw a 4" square on graph paper and draw the chosen pattern in it's true size and then ask yourself again if it'll work or if the pattern looks crowded in the block at real size.  It's been my experience that it's better to error on the side of simplicity with Welsh patterns and design rather than overdoing the design. 

Here's the last tip for today (I think).  When planning your design, choose patterns like you would printed fabrics.  Include some large scale patterns, but also some medium and small scale patterns.  Choose organic, flowing patterns like spirals, hearts or leaves and complement them with the more geometric patterns.   It's like choosing a variety of printed fabrics to work together.  If something looks awkward, check the combination of the patterns and the scale.  I made a pillow with Welsh patterns back in the early days and when it was done it just didn't look right and after studying it a bit I realized that the trouble was in the scale of the patterns, I had small, close patterns around the outside and a larger, more open pattern in the middle and it just didn't look right.  Go find pictures of Welsh quilts and study the patterns and the way the patterns are combined.  There is a simplicity to the whole process that is a bit of a challenge for those of us in these modern'ish' times who often seem driven to make the process as hard as we can.  Relax

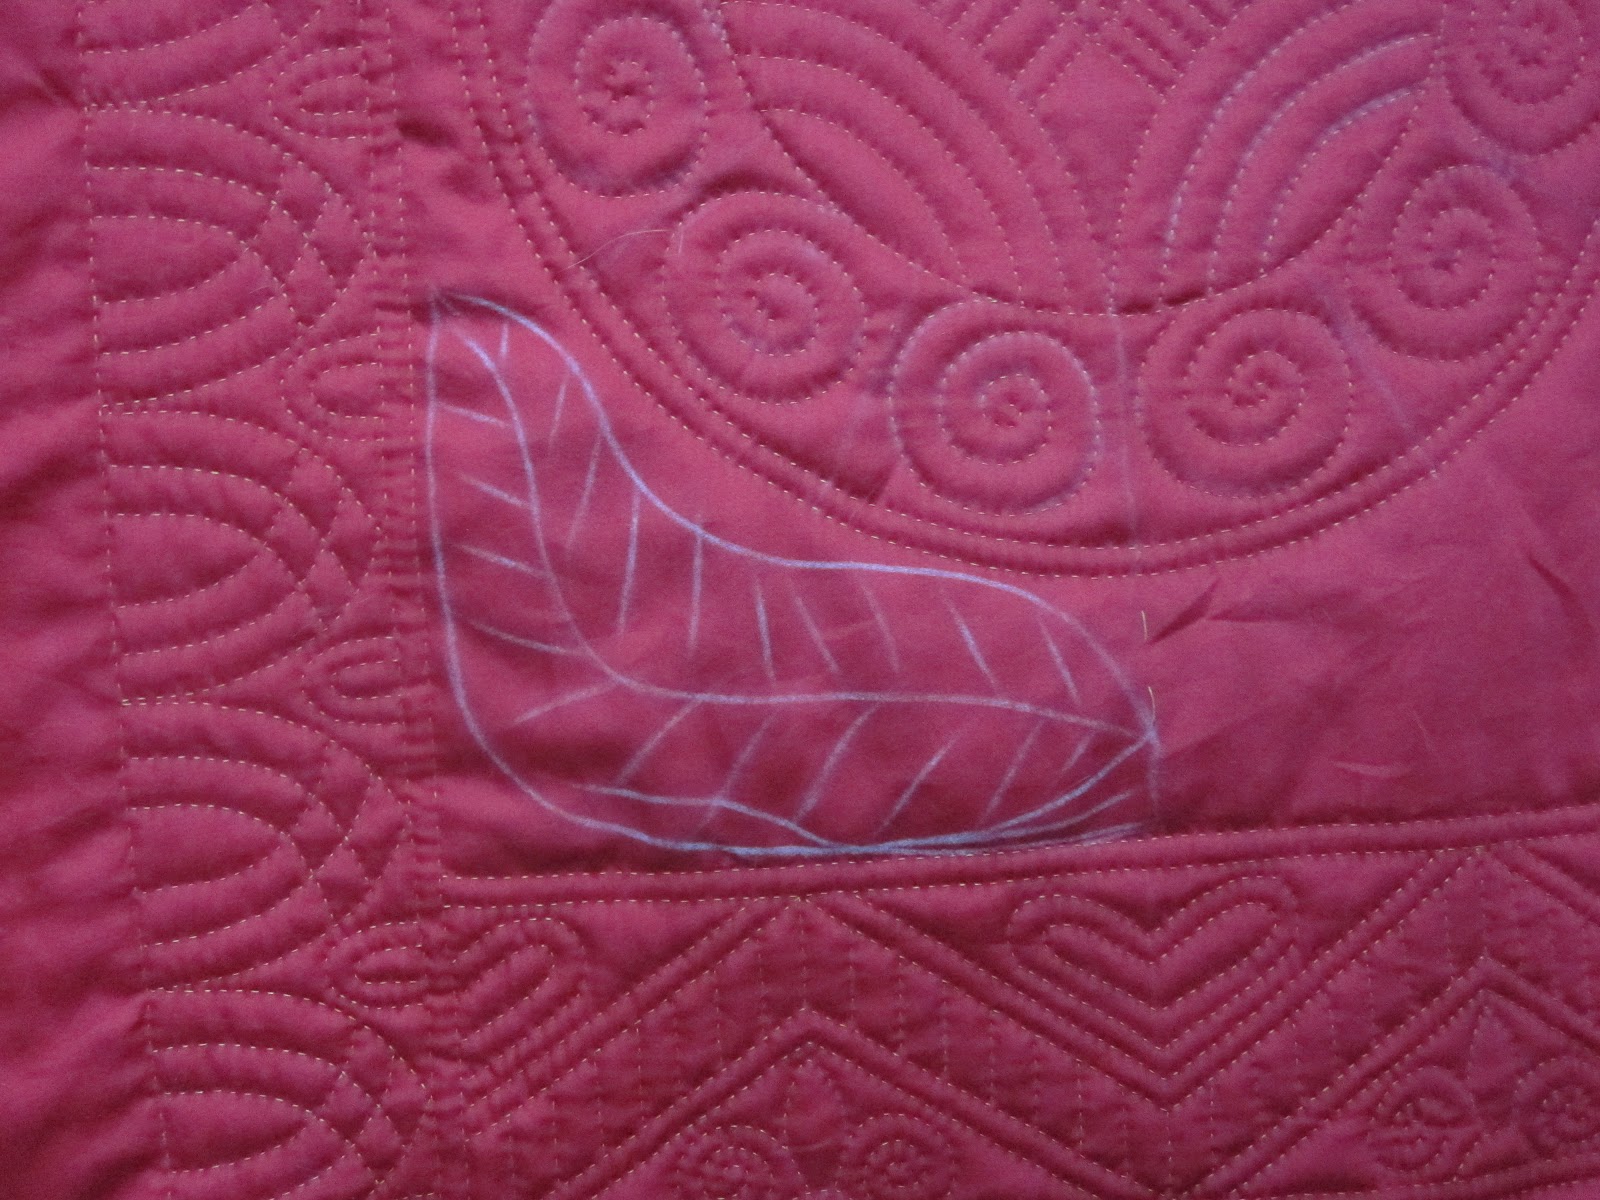
So, here's a picture to look at and consider what I've said above.  This is a close-up of the quilt shown below.  Notice the variety of geometric lines and patterns alongside curved, organic lines.  There are smaller patterns (the spirals) and larger patterns (the leaf).  Also, some of the patterns started from templates (more on that later) and some were drawn free-hand.  The cable pattern shown on the gold was spaced using paper tape.


The full photo doesn't show as well as I'd like but you can look at the patterns and see the variety and ideas for how they might be combined.  This isn't a traditional lay-out for a Welsh quilt.  I had seen an antique American quilt that was pieced this way but which was quilted in a very nondescript design so I adapted the Welsh patterns to the pieced top and this is one of my favorite quilts.  Also, notice this one has a binding sewn on the outer edge rather than the folded, knife edge finish.  The pieced design needed the colored binding around the edge to finish it off.  Wholecloth quilts are a challenge to photograph, mine were shot by Mark Frey,a professional photographer who has done many quilts.  And lucky for me, he's a neighbor (around here, that means he lives within 10 miles).


Enjoy... and if your brain gets too full, take a catnap... it always works for Frank.


Monday, April 1, 2013

Welsh Quilt Marking Tutorial - Getting Started

When I discovered Welsh quilts almost twenty years ago, there was very little information in print on how to mark these quilts.  As I studied them and figured out the marking process (the best I could), I discovered that I had to rethink the process and separate it so to speak from what I had already learned as an American quilter and product of the American quilt revival of the 70's.  The best I can do as a quiltmaker is to create a quilt that is inspired by traditional Welsh quilts because I'm creating my quilts in different circumstances.  I've learned differently, the materials are different and I've been influenced by traditions from outside Welsh quiltmaking such as the modern emphasis on perfection.  If anything, Welsh quiltmaking can be a pleasant escape from modern perfectionism.  However, don't get the idea that I see Welsh quiltmaking as a shrine to the past.  I enjoy working in the very traditional style but I've taken everything I've learned in the process and applied it throughout my quiltmaking.  Welsh quiltmaking is my dominate influence now, it's influence is present throughout everything creative that I do.

Right from the beginning, I worked on graph paper to design and I tend to think that my Welsh ancestors would've used it too.  So, to get started, I ask myself a couple questions.  How big will it be, how many borders and so on.  When I work on graph paper, I can figure out options for enlarging it.  For example, if the corner blocks are 4x4 squares on the graph paper, I can figure that one square will equal 1" and then figure the square to be 4"square and so on.  However, the best way to get started is to figure the overall outside dimensions and work towards the inside.


This picture shows a page in my sketchbook with the basic design for the quilt I'm working on at this time.  This give me an outside dimension, the width of the outside borders, an additional set of borders because the quilt is a rectangle and the circle in the center.  I will often try out different patterns in different spots.  Sometimes I use what I sketch in but often times, the design takes on an organic nature and a life of it's own but the design on paper is still a good way to get started, even if you don't stick with it.  You can see where I've written notes around the outside which will help me remember ideas.  I've also included the double lines (lower left corner of sketch) to tell me which side of the dividing lines I plan to put the lines which are a key feature of Welsh quilts.  The double lines define the borders, ect.  Resist the temptation to leave them out, they define the design and are worth the extra marking and quilting.  The double lines are also helpful in defining any pattern that you want to stand out a bit such as a leaf or heart.  Patterns not double lined tend to blend together... more on this later.

 
Now it's time to choose fabric.  The fabrics shown in the picture are both cotton sateen.  The red will go on the front and the floral will go on the back.  I really like florals on the backs, they show the texture differently and hide imperfect stitches.  When florals became popular among the Welsh quiltmakers, the quality of the quilting tended to take a turn for the worse because the stitches and patterns didn't show up as well.  But, I can put it on the back and enjoy it there.  When planning your quilt, quality of the fabric does matter... use the best you can afford.  Sateen works best with sateen, you can put regular, flat cotton on the back but it gives differently and I find that it needs closer basting.  If you plan to use sateen, expect to hand baste it.  Sateen is made up of finer fibers and can suffer from holes left behind by safety pins or other quick methods.


So, go make sketches on some graph paper, choose your fabric and get ready to start marking your top.